Paw Patrol Family Halloween Costume

diy-paw-patrol-halloween-costumes-projectsinparenting

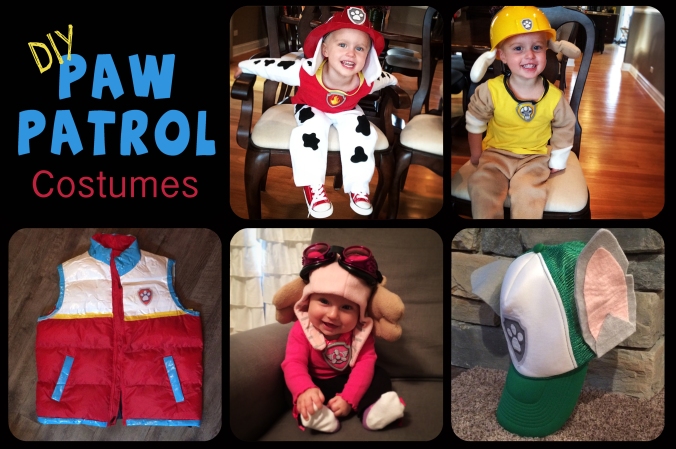
Since my Ghostbusters Costumes / DIY Proton Pack has been receiving the most amount of blog traffic, I thought I’d throwback to 2014 and share details on how I made our Paw Patrol Halloween costumes as well…

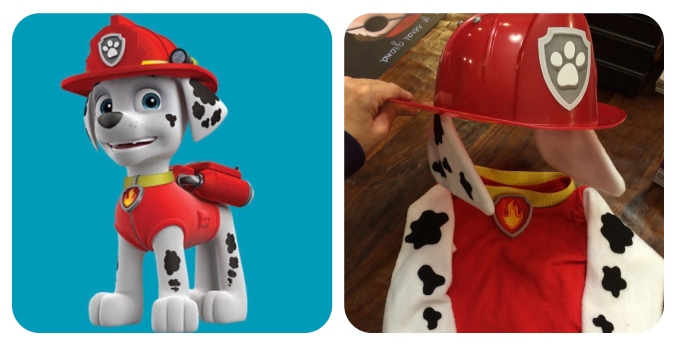
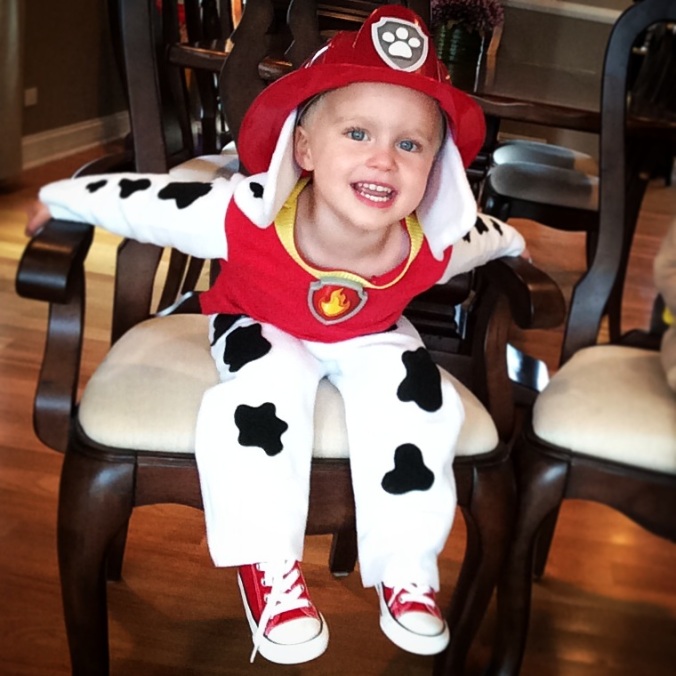
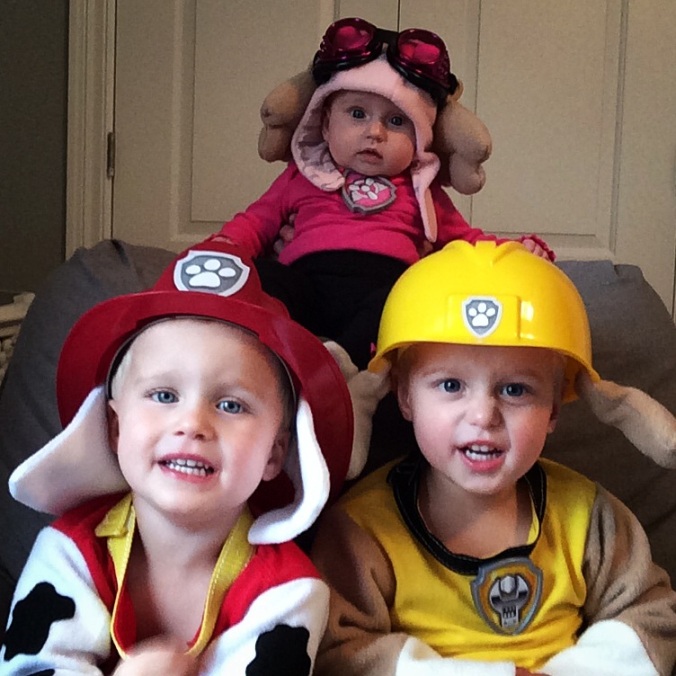
With Jacob’s obsession for the color red, it was no surprise he wanted to be Marshall the fire pup! I purchased a toy fireman hat and red t-shirt from Amazon. After cutting off the sleeves to the t-shirt, I sewed on arms and made pants by using white fleece fabric and attaching black felt spots with Stitch Witchery (a no-sew/iron-on fusible tape – LOVE this stuff!). I hot glued ears to the helmet, added a collar with yellow strapping, and finished it with the final touch of his pup badge (from the Action Pack Pup & Badge toy) and Paw Patrol hat sticker (printed on sticker paper).

Marshall Paw Patrol Halloween Costume 2 - projectsinparentingMarshall Paw Patrol Halloween Costume - projectsinparenting

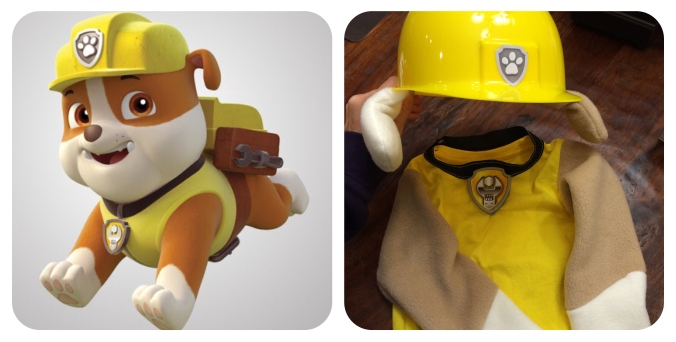
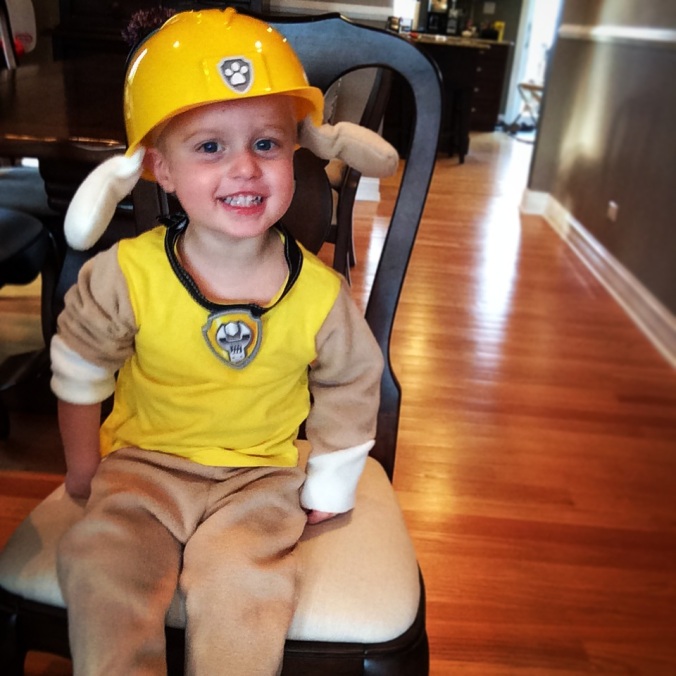
Evan wanted to be “Rubble on the double!”, so I purchased a toy construction hat and yellow t-shirt. I cut off the t-shirt sleeves to sew on arms, and made pants by using  fleece fabric. I created his ears with the same fabric, and gave them dimension by using Poly-fill and pipe cleaners. After attaching the ears with a glue gun, I added the Paw Patrol hat sticker (printed on sticker paper). Using black strapping, I added the collar and attached Rubble’s pup badge (from the Action Pack Pup & Badge toy) to the shirt.

Rubble Paw Patrol Halloween Costume 2- projectsinparentingRubble Paw Patrol Halloween Costume - projectsinparenting

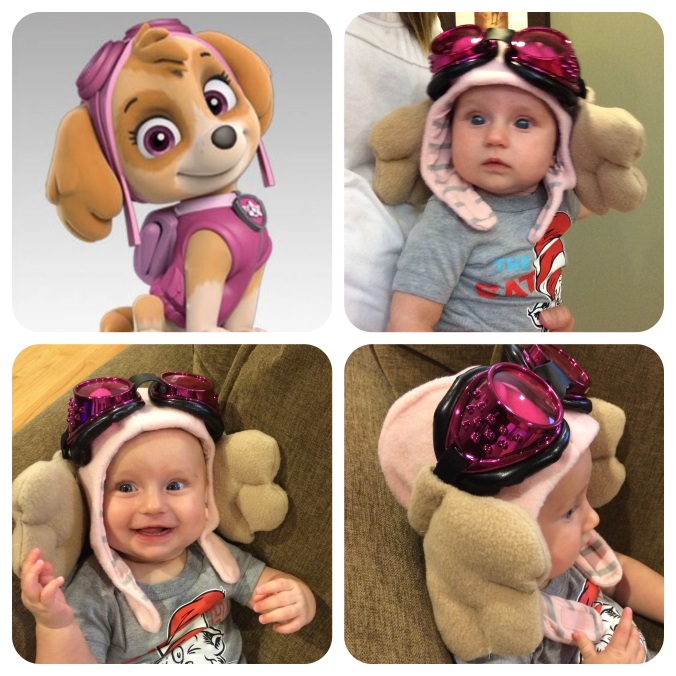
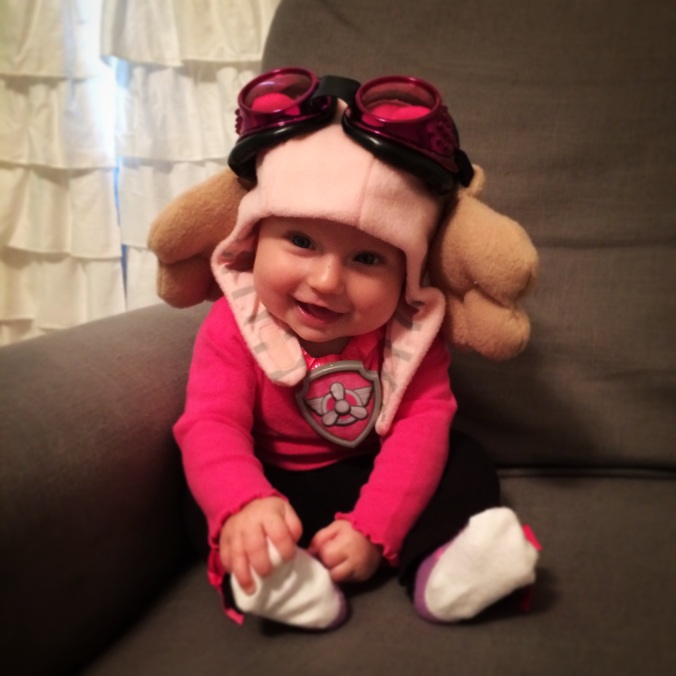
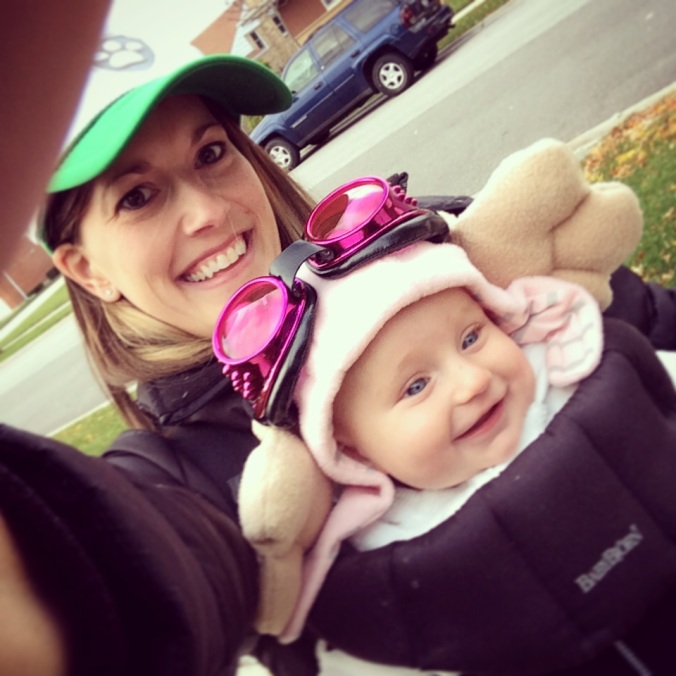
It was only appropriate for Avery to be Skye (this was before Everest was introduced), so I purchased pink aviator goggles, sewed ears using fleece fabric stuffed with Poly-fill, then attached the ears by sewing them around the goggle straps (leaving flexibility for all sizes to wear – even adults!). I already had a pink aviator-style hat from GAP that worked perfectly (it is now sold out, but Amazon has a similar one), and I kept it simple with a pink long-sleeve onesie and black pants. And of course, can’t forget the pup badge!

Skye Paw Patrol Halloween Costume 2 - projectsinparentingSkye Paw Patrol Halloween Costume - projectsinparenting

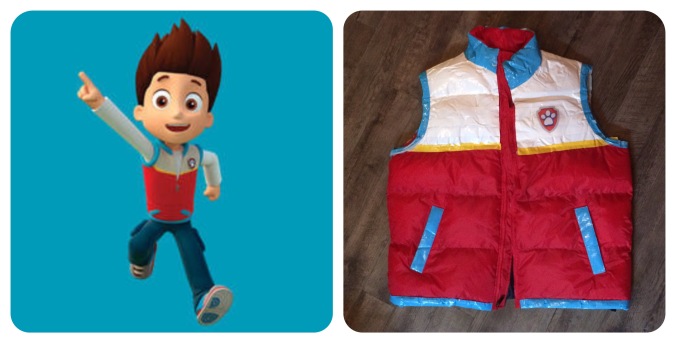
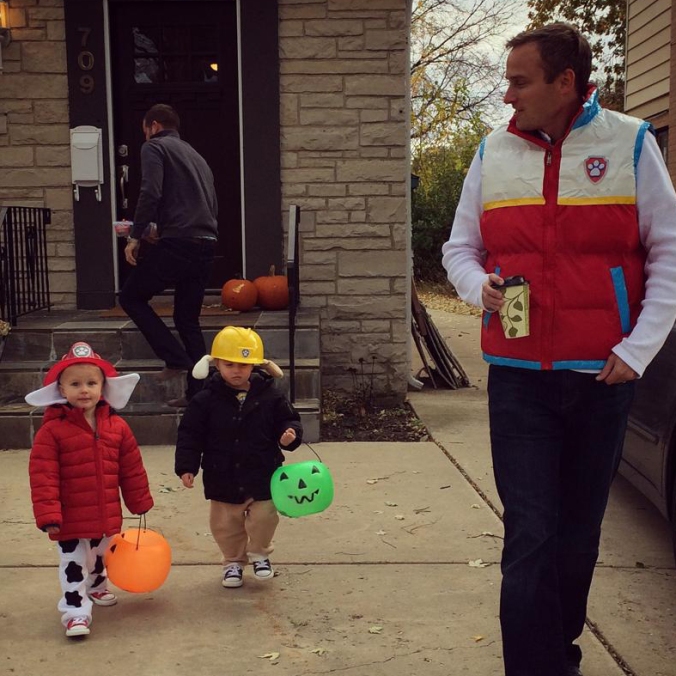
As male leader of the pack, Cory dressed up as Ryder, wearing a red puffer vest that I found on Amazon (the exact one I used has since been discontinued but they offer other options as well, like this one). They also offer kid puffer vests, (option #2) as well as fleece vests for a lower cost option. I used white, yellow and blue duct tape to create the illusion of Ryder’s vest and added a badge (printed on sticker paper) for more authenticity.

Ryder Paw Patrol Halloween Costume projectsinparentingRyder Costume projectsinparenting

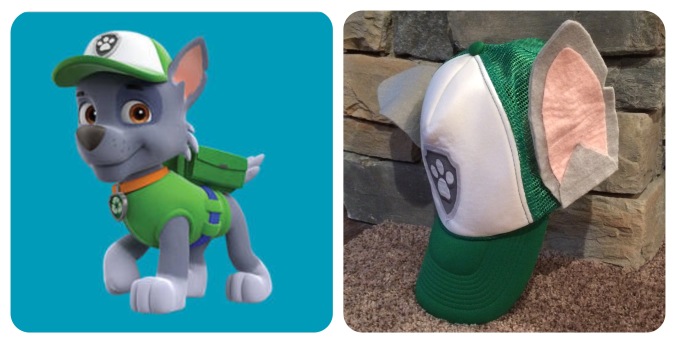
Don’t lose it, re-use it! I decided to be Rocky, so got myself a green shirt and trucker cap. Creating simple ears using felt, I attached them to the cap with hot glue, then added the Paw Patrol hat sticker, and attached Rocky’s pup badge to my shirt.

Rocky Paw Patrol Halloween Costume projectsinparentingRocky Skye Paw Patrol Halloween Costume - projectsinparenting

It’s Paw Patrol, we’re on a roll!!…

Marshall Rubble Skye Paw Patrol Halloween Costume - projectsinparenting

Over a year later, the boys still cram their heads through these 2T neck holes, just so they can team up and pretend to save Adventure Bay!… Pretend play at it’s best.

Related: DIY Lion Guard Costumes

Color-Coded Beginner Piano Music Book Banner


Constellation Sticker Craft

Constellation Sticker Craft - projectsinparenting

All things outer space has been a huge interest of the boys lately. They enjoy star gazing, identifying planets in the sky, and were thrilled to see the Super Blood Moon this past summer.

12032754_10153476110412415_9065535462831191832_o

Although it would be amazing if the moon were really that huge, it’s enlarged for effect  🙂

Jacob’s favorite thing to wear are his constellation pajama pants (as seen above) and he’s always asking us to point out the Big Dipper, especially after reading Touch the Brightest Star – one of his favorite interactive books, where you trace the Big and Little Dipper with your finger as part of the story. (Great book for any toddler’s bed time collection!)

I wanted a fun way to teach them the basic constellations, and ones that are easy to spot in the sky, so I came up with the following craft worksheets…

Big Dipper WorksheetLittle Dipper WorksheetCassiopeia WorksheetCygnus Worksheet

LeoPegasusOrion WorksheetCepheusGemini

Click on individual worksheet above for FREE printable, or HERE for pdf with ALL Worksheets.

First I had the boys place star stickers on the grey dots, then using the picture as reference, draw lines to create each constellation.

image1(2)

image2

After learning the constellations, the boys got creative with their worksheets – connecting the dots without stickers, outlining the constellation in all star stickers, putting other stars in the sky, tracing the letters to spell the constellations, etc. I enjoy watching them explore whatever materials I give them. It’s fun when they think outside the box and come up with new ways to do things… A great hands-on way to learn while using imagination and creativity!

image3.PNG

“Don’t wait for the stars to align. Reach up, rearrange them the way you want them to be. Create your own constellation.” – Pharrell Williams

Save

Save

Save

DIY Milk Bottle Holiday Candy Gift

I’ve always thought Mason jar gifts are super cute, so I wanted to create something similar for the boys’ teachers this year. I decided to steer clear of any gifts that give the gifted a task – such as “here are some ingredients,  now go bake cookies!”… Let’s be real, if a teacher is on “break” that last thing I’d want to do is give her something that requires additional work . That said, I chose the traditional route of candy. Most everyone loves chocolate, right?

I included the following festive assortment:

  • Holiday M&Ms
  • Kit Kat Holiday Assortment
  • Andes Mints
  • Lindor Milk Chocolate Truffles
  • Soft Mint Candy

I found these adorable plastic milk bottles at Jo-Ann Fabric for 1/2 off (Score!). They have since sold out, however you can find similar ones HERE on Amazon. Two of the teachers have preschool aged children as well, so I thought they might be interested in re-using the milk bottles. I bought one for myself as well, and plan on using it for “Santa’s Milk” to be left out on Christmas Eve with the cookies.

DSC_0003

I’m usually not a fan of puns, but I came up with this “sweet” saying for the tag, so decided to run with it…


The boys helped me fill the milk bottles with candy, and signed the back of the tags with their name (Note: Leaving the straw in the bottle while stuffing the candy in, avoids you from having to stab through the candy pile later)… Hopefully their teachers enjoy the candy as much as we enjoyed the pieces we taste-tested (for quality purposes of course).

DSC_0005

Follow me on Pinterest, for more fun ideas!

“Chocolate comes from cocoa… which is a tree.

That makes it a plant.

Chocolate is salad.”

Stained Glass Sun Catcher Ornament

‘Tis the season for Christmas crafts!

Stained Glass Ornament 2

We decided to make these beautiful sun catcher ornaments, to look like stained glass. They make great window decorations and help set the mood for the season. A super-easy, no-mess craft, perfect for all ages!

1st a little prep-work to get the project ready…

Microsoft Word - Document3

Click HERE for free printable.

Print this ornament shape (provided above), ideally on card stock, and cut out the CENTER of the ornament frame with an X-Acto knife or scissors.

DSC_0003

Prepare colored tissue paper by cutting them into squares, strips and/or shapes. For toddlers, squares are perfect. For older kids, shapes would give them the opportunity to experiment with more complex designs (Example: A star in the center with stripes in the background, etc.)… NOTE: I separated the tissue paper squares into coordinating cup colors for easy selection. I’m not pointing this out to show how overly organized I can be, I’m sharing this to display one of the MANY ways I’ve re-purposed the cups provided in our Easter egg dying kit. Great items to save and reuse!

DSC_0009

Adhere a piece of contact paper to the FRONT of your pre-cut ornament print-out, covering the entire ornament frame. Lay the paper down, sticky side up, onto a table.  (I ran out of contact paper and discovered that clear packaging tape works as a wonderful substitute!) Now it’s time for your little artist(s) to decorate their ornaments. Have them select their tissue paper pieces, and press them down onto the contact paper.

DSC_0024

When your ornament decorating is complete, seal the back with another piece of clear contact paper. Trim around the outside of your ornament frame and tape or hang your masterpiece in a window to enjoy the beautiful stained glass colors!
Stained Glass Ornament
Follow me on Pinterest, for more fun ideas!
“People are like stained glass windows. They sparkle and shine when the sun is out, but when the darkness sets in, their true beauty is revealed only if there is a light from within.” – Elisabeth Kubler Ross

Fall Leaf Lantern

While it can be difficult saying goodbye to long sunny days of summer, there are several things that help me embrace fall with open arms: sweater weather, boots, apple picking, Halloween, pumpkin spice, and of course the beautiful foliage. Thank you autumn, for one of nature’s best free kid toys – leaves! To bring some of these enchanting colors indoors, I decided to create fall leaf lanterns with the kids.

DIY Fall Leaf Lantern Kids Craft - projectsinparenting.com

SUPPLIES:
– Cardboard Goldfish Carton (or 1/2 Gallon Milk Carton)
– Box Cutter and/or Scissors
– Flameless Candle
– Contact Paper
– Hole Puncher
– String
– White Duct Tape (Optional)

INSTRUCTIONS:

Step 1: Collect leaves.Fall Leaf Lantern - projectsinparenting.com

Step 2: Using a box cutter, cut 4 rectangular sections out of each side of the carton.Fall Leaf Lantern - projectsinparenting.com

Step 3: (Optional) Use white Duct Tape to cover print on the carton.Fall Leaf Lantern - projectsinparenting.com

Step 4: Using scissors, cut contact paper into 8 rectangles that are just larger than the sections cut out of the cartons (my rectangles were 10×15 squares).Fall Leaf Lantern - projectsinparenting.com

Step 5: Adhere contact paper rectangle, sticky side out, onto the inside of each side of the carton and reinforce sections by taping each inside edge and corner.Fall Leaf Lantern - projectsinparenting.com

Step 7: Gently press leaves on each side of the carton’s contact paper sections.Fall Leaf Lantern - projectsinparenting.com

Step 8: Use remaining 4 sections of contact paper to cover each side of the carton, holding leaves onto the lantern.Fall Leaf Lantern - projectsinparenting.com

Step 9: Hole punch top of carton and tie string as a handle for the lantern. Create Duct Tape tab to hold lantern top closed.Fall Leaf Lantern - projectsinparenting.com

Step 10: Insert flameless candle.Fall Leaf Lantern - projectsinparenting.com

DIY Fall Leaf Lantern Kids Craft - projectsinparenting.com

Follow me on Pinterest, for more fun ideas!